Today we will be focusing on using basic shapes. Before we start, let's first take a look at how to select a basic shape so that you will have no problems in selecting and editing shapes later.
Video: Using the Selecting Tools
Video: Using the Selecting Tools
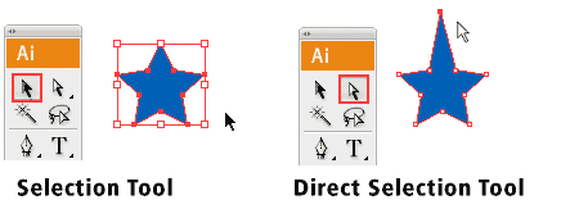
There are 2 types of selection tool in Illustrator used for selection objects.
Selection Tool: Used for selecting and moving a shape. It can also be used to resize a shape.
Direct Selection Tool: Selects a single anchor point instead of the whole shape. Used for editing anchor point of a shape. Click once on a point to select and hold Shift to select multiple anchor points.
Selection Tool: Used for selecting and moving a shape. It can also be used to resize a shape.
Direct Selection Tool: Selects a single anchor point instead of the whole shape. Used for editing anchor point of a shape. Click once on a point to select and hold Shift to select multiple anchor points.
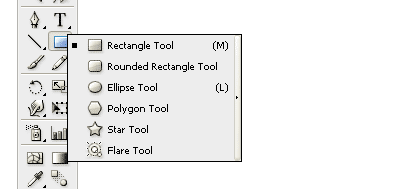
Now we will move on to the Shape Tools. When you go to the Tool Palette and hold the Rectangle Tool, a list of shape tools will expand out for you to pick. We will start with the default Rectangle Tool.
Understanding Fill & Stroke
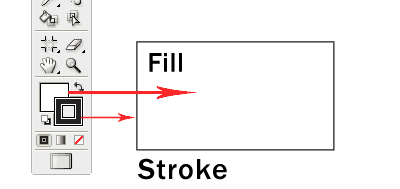
Click and drag out a Rectangle as shown. By default, it has a white fill and black stroke. (Stroke is the border of the shape)
Click and drag out a Rectangle as shown. By default, it has a white fill and black stroke. (Stroke is the border of the shape)
Changing Fill Color
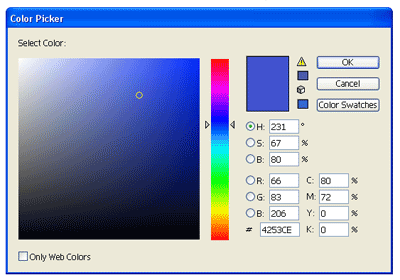
Let’s start changing the fill color for the rectangle. Double click the Fill from the Tool Palette. It will pop up the Color Picker. Drag the slider to blue and select a deep blue color. Click OK after that.
Let’s start changing the fill color for the rectangle. Double click the Fill from the Tool Palette. It will pop up the Color Picker. Drag the slider to blue and select a deep blue color. Click OK after that.
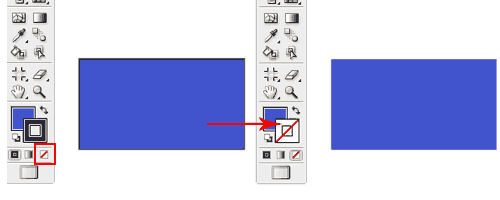
Removing Stroke
Click the Stroke in the Tool Palette once to swap it above Fill. Click the None icon boxed up in red to set the Stroke to None. The black stroke will disappear.
Click the Stroke in the Tool Palette once to swap it above Fill. Click the None icon boxed up in red to set the Stroke to None. The black stroke will disappear.
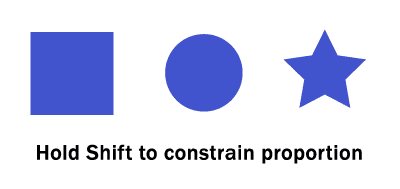
Constrain Proportions
To draw a perfect square, we will select the Rectangle Tool. Hold Shift and drag to draw a square. Same for the circle, we will select the Ellipse Tool and hold Shift to drag out a circle
To draw a perfect square, we will select the Rectangle Tool. Hold Shift and drag to draw a square. Same for the circle, we will select the Ellipse Tool and hold Shift to drag out a circle
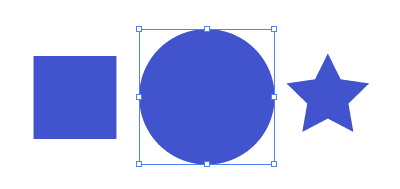
Resizing Shapes
To resize shapes, select the shape using the Selection Tool and a bounding box will appear. Drag the corner anchor point to resize it. To constrain to proportion while resizing, hold Shift as you resize. Also hold Alt/Option if your want to resize from the same position.
To resize shapes, select the shape using the Selection Tool and a bounding box will appear. Drag the corner anchor point to resize it. To constrain to proportion while resizing, hold Shift as you resize. Also hold Alt/Option if your want to resize from the same position.
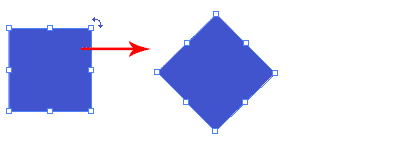
Rotating Shapes
Select the shape with the Selection Tool and a bounding box will appear. Move your cursor near the anchor corner and a rotation icon will icon, click and turn it to rotate the square. To snap at 45 degrees increment, hold Shift and turn.
Select the shape with the Selection Tool and a bounding box will appear. Move your cursor near the anchor corner and a rotation icon will icon, click and turn it to rotate the square. To snap at 45 degrees increment, hold Shift and turn.
More Options for Shape Tools
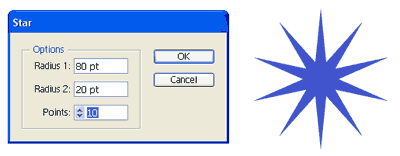
Select the Star Tool. Click once on the artboard and an option will pop up. Enter the same values below and click Ok. It will draw a star burst shape. This method can be used to bring out more options for shape tools.
Select the Star Tool. Click once on the artboard and an option will pop up. Enter the same values below and click Ok. It will draw a star burst shape. This method can be used to bring out more options for shape tools.
Lesson #1 Part B: Combining Objects
Pathfinder
Pathfinder panel overview
You use the Pathfinder panel (Window > Pathfinder) to combine objects into new shapes.
Pathfinder panel overview
You use the Pathfinder panel (Window > Pathfinder) to combine objects into new shapes.
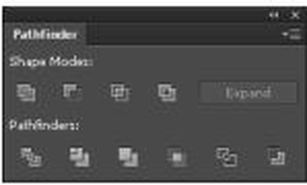
The top row of buttons in the panel, make paths or compound paths by default, and compound shapes only when you press the Alt or Option key. You can choose from the following shape modes:
Add To Shape Area: Adds the area of the component to the underlying geometry.
Subtract from Shape Area: Cuts out the area of the component from the underlying geometry.
Intersect Shape Areas: Uses the area of the component to clip the underlying geometry as a mask would.
Exclude Overlapping Shape Areas: Uses the area of the component to invert the underlying geometry, turning filled regions into holes and vice versa.
The bottom row of buttons in the panel, called Pathfinder effects, let you create final shape combinations on the first click.


Pathfinder options
You can set Pathfinder Options from the Pathfinder panel menu or by double-clicking a Pathfinder effect in the Appearance panel.
Precision: Affects how precisely the Pathfinder effects calculate an object’s path. The more precise the calculation, the more accurate the drawing and the more time is required to generate the resulting path.
Remove Redundant Points: Removes unnecessary points as you click a Pathfinder button.
Divide And Outline Will Remove Unpainted Artwork: Deletes any unfilled objects in the selected artwork as you click the Divide or Outline button.
Summary:
Add: Traces the outline of all objects as if they were a single, merged object. The resulting shape takes on the paint attributes of the top object.
Intersect:Traces the outline of the region overlapped by all the objects.
Exclude: Traces all nonoverlapping areas of the objects, and makes overlapping areas transparent. Where an even number of objects overlap, the overlap becomes transparent. Where an odd number of objects overlap, the overlap becomes filled.
Subtract: Subtracts the frontmost objects from the backmost object. You can use this command to delete areas of an illustration by adjusting the stacking order.
Minus Back: Subtracts the objects in back from the frontmost object. You can use this command to delete areas of an illustration by adjusting the stacking order.
Divide: Separates a piece of artwork into its component filled faces (a face is an area undivided by a line segment).
note: When you use the Divide button in the Pathfinder panel, you can use the Direct Selection or Group Selection tool to manipulate the resulting faces independently of each other. You can also choose to delete or preserve unfilled objects when applying the Divide command.
Trim: Removes the part of a filled object that is hidden. It removes any strokes and does not merge objects of the same color.
Merge: Removes the part of a filled object that is hidden. It removes any strokes and merges any adjoining or overlapping objects filled with the same color.
Crop: Divides artwork into its component filled faces, and then deletes all the parts of the artwork that fall outside the boundary of the topmost object. It also removes any strokes.
Outline: Divides an object into its component line segments, or edges. This command is useful for preparing artwork that needs a trap for overprinting objects.
note: When you use the Outline button in the Pathfinder panel, you can use the Direct Selection or Group Selection tool to manipulate each edge independently. You can also choose to delete or preserve unfilled objects when applying the Outline command.
Compound shapes
About compound shapes
A compound shape is editable art consisting of two or more objects, each assigned a shape mode. Compound shapes make it easy to create complex shapes because you can precisely manipulate the shape mode, stacking order, shape, location, and appearance of each path included.
Compound shapes act as grouped objects and appear as <Compound Shape> items in the Layers panel. You can use the Layers panel to show, select, and manipulate the contents of a compound shape—for example, to change the stacking order of its components. You can also use the Direct Selection tool or the Group Selection tool to select components of a compound shape.
When you create a compound shape, it takes on the paint and transparency attributes of the topmost component in Add, Intersect, or Exclude mode. Subsequently, you can change the paint, style, or transparency attributes of the compound shape. Illustrator facilitates this process by automatically targeting the whole compound shape when you select any part of it, unless you explicitly target a component in the Layers panel.

Work with compound shapes
Creating a compound shape is a two-part process. First, you establish a compound shape in which all components have the same shape mode. Then, you assign shape modes to the components until you obtain the desired combination of shape areas.
Create a compound shape
Select all the objects you want to be part of the compound shape. You can include paths, compound paths, groups, other compound shapes, blends, text, envelopes, and warps in a compound shape. Any open paths you select are automatically closed.
Do one of the following:
Modify a compound shape
Release and expand a compound shape
Releasing a compound shape separates it back into separate objects. Expanding a compound shape maintains the shape of the compound object, but you can no longer select the individual components.
Select the compound shape using the Selection tool or Layers panel. Do one of the following:
Creating a compound shape is a two-part process. First, you establish a compound shape in which all components have the same shape mode. Then, you assign shape modes to the components until you obtain the desired combination of shape areas.
Create a compound shape
Select all the objects you want to be part of the compound shape. You can include paths, compound paths, groups, other compound shapes, blends, text, envelopes, and warps in a compound shape. Any open paths you select are automatically closed.
Do one of the following:
- In the Pathfinder panel, Alt-click (Windows) or Option-click (Mac OS) a Shape Modes button. Each component of the compound shape is assigned the shape mode you select.
- Select Make Compound Shape from the Pathfinder panel menu. Each component of the compound shape is assigned the Add mode by default.
- To sustain maximum performance, create complex compound shapes by nesting other compound shapes (containing up to about 10 components each) instead of using many individual components.
Modify a compound shape
- Use the Direct Selection tool or Layers panel to select an individual component of the compound shape.
- Look for the highlighted Shape Mode button in the Pathfinder panel to identify which mode is currently applied to a selected component.
- In the Pathfinder panel, click a different Shape Mode button.
Release and expand a compound shape
Releasing a compound shape separates it back into separate objects. Expanding a compound shape maintains the shape of the compound object, but you can no longer select the individual components.
Select the compound shape using the Selection tool or Layers panel. Do one of the following:
- Click Expand in the Pathfinder panel
- Choose Expand Compound Shape from the Pathfinder panel menu.
- The compound shape is converted to a <Path> or <Compound Path> item in the Layers panel, depending on the shape mode it used.
- Choose Release Compound Shape from the Pathfinder panel menu.
Lesson #2: Designing a Logo
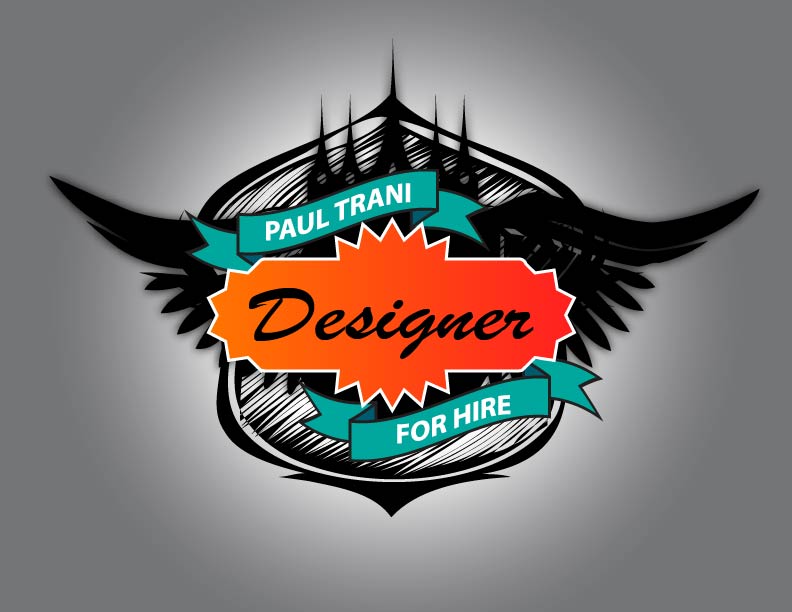
In this lesson, you will be watching how a designer uses Illustrator to create a logo which will help with your next project. Check out the videos below for a step-by-step guide to how the designer made the logo shown below.
Click to set custom HTML
Lesson #3: Logo Tutorial