THursday September 19th 2019
Grade 8 Period 3/4
- First thing you need to do is:
- FILE > OPEN and find your saved project from last class. Some of you might not have gotten to this point yet, but your photo can be found on their Google Drive under “Shared with Me” then the “Period 3 or 4” folder.
- If you need to download your photo from your drive, click on the download button (downward arrow with line) in the top right corner. The file will pop up in the bottom left hand screen. When you click on the file it will open in Photo Viewer. You will need to go File>Make a copy, and then save it to your Name Drive.
- Make a new Photoshop File (11X8.5) and go FILE>PLACE EMBEDDED. Choose your image, and then stretch it out to fit the whole canvas (CTRL+T). Before you can start you need to right-click on your new layer, and select RASTERIZE LAYER.
- FILE > OPEN and find your saved project from last class. Some of you might not have gotten to this point yet, but your photo can be found on their Google Drive under “Shared with Me” then the “Period 3 or 4” folder.
- If you have your photo ready to go, then you are working on cutting out the background and turning it into a silhouette.
- Using Quick-Select, select the body (using ALT if you need to deselect). Once your body has been selected, they need to go CTRL+SHIFT+I, let go and then press delete. Get rid of the marching ants (CTRL+D). Hold down CTRL and Click the Thumbnail of the silhouette layer. There should be marching ants around the people. Make sure the color black has been selected then ALT+BACKSPACE.
- You can use the eraser (E on keyboard) to erase any extra pieces or the brush (b on the keyboard) to add/clean up silhouette.
- Once your pose is black you can add photos:
- Step #1 – PASTE (CTRL+V)
- Step#2 - SIZE AND POSITION(CTRL+T) – decide if you want to keep your background
- Step#3 - CTRL+CLICK the THUMBNAIL. You should see marching ants in the shape of your body
- Step#4 – Make sure you are on the layer you want to cut. Then CTRL+SHIFT+I, let go, press DELETE
- If you have time you can add effects:
- Rearranging layers – click on the layer and drag it to where you want it to go
- Feathering edges – press E for eraser, right click and lower hardness to 0%, increase the size of your brush to a large size, then erase edges
- Fade photos – lower opacity (above layer palette)
- Rotating photos – CTRL+T, then bring your mouse just past the corner and a curved mouse will appear. Click and drag.
- Troubleshooting tips:
- Am I on the right layer?
- Am I in a transformation? (if so press ENTER)
- Do I have something tiny selected? (If so press CTRL+D)
- On your website on the COLLAGE page they should have written down down 5-10 ideas, thinking about things like images, colour, style etc.
- Get a photo of yourself from social media or your phone and email it to yourself. They need to DOWNLOAD the photo and save it to their NAME DRIVE.
- Once you have your main photo then you are working on adding to your collage. More information about what you need can be found on my website under GRADE 9>DIGITAL SELF-PORTRAIT if you forgot.
- Troubleshooting tip for inserting photos from name drive:
- Go into PS and make a new document (11X8.5, resolution 300)
- To get a SAVED image onto your PS canvas, go file PLACE EMBEDDED. Click on your image. It will automatically be in a transformation so press enter. Then you need to right click on the layer, and click RASTERIZE LAYER. You are now good to go!
Thursday March 14th 2019
Grade 8 Period 3:
Create a MEME (school appropriate). You can use any photos from the internet (appropriate) you like and try out the type tool.
Type: Press “T” on your keyboard and click once on your canvas. Start typing. Highlight or CTRL+A to change the font style, size or color. Press the checkmark when you are done!
If finished:
Your next task is to create an album cover from a favourite song you have. You can use any photos, any tools you've learned, and add on any text using the type tool.
Grade 8 Period 4:
Finish your meme and put on your portfolio (on a new slide)
Your task today is to create an album cover from a favourite song you have. You can use any photos, any tools you've learned, and add on any text using the type tool.
Grade 9 Period 5/6:
Choose one of these mini assignments to work on today and put your result on your website. If you finish early challenge yourself with another one! You'll need to use the skills you've learned so far to try and figure out a way to do these.
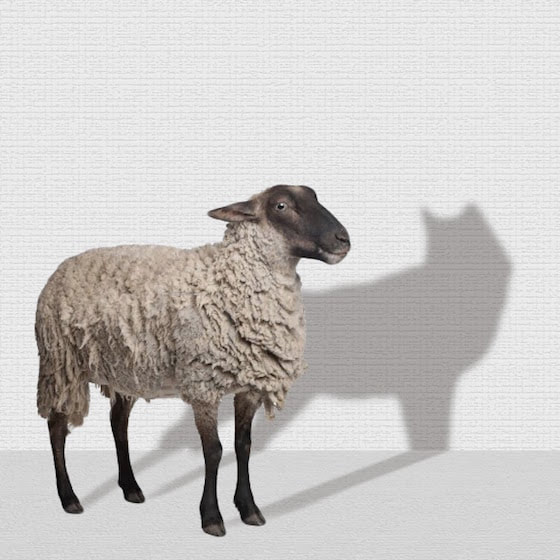
1. True Identity
Be it a reflection in a puddle or a shadow on the wall, the objective is to use Photoshop to show an image’s true identity in its reflection. Perhaps you’ll show a wolf in sheep’s clothing or a kitten dreaming of being a lion. Be clever because the true self can only be seen in the shadows!
Create a MEME (school appropriate). You can use any photos from the internet (appropriate) you like and try out the type tool.
Type: Press “T” on your keyboard and click once on your canvas. Start typing. Highlight or CTRL+A to change the font style, size or color. Press the checkmark when you are done!
If finished:
Your next task is to create an album cover from a favourite song you have. You can use any photos, any tools you've learned, and add on any text using the type tool.
- Layer Styles (double click on layer)
- Blend mode/ opacity (Blend mode is where it says NORMAL above the layers palette)
Grade 8 Period 4:
Finish your meme and put on your portfolio (on a new slide)
Your task today is to create an album cover from a favourite song you have. You can use any photos, any tools you've learned, and add on any text using the type tool.
- Layer Styles (double click on layer)
- Blend mode/ opacity (Blend mode is where it says NORMAL above the layers palette)
- Type tool (press T on your keyboard)
Grade 9 Period 5/6:
Choose one of these mini assignments to work on today and put your result on your website. If you finish early challenge yourself with another one! You'll need to use the skills you've learned so far to try and figure out a way to do these.
1. True Identity
Be it a reflection in a puddle or a shadow on the wall, the objective is to use Photoshop to show an image’s true identity in its reflection. Perhaps you’ll show a wolf in sheep’s clothing or a kitten dreaming of being a lion. Be clever because the true self can only be seen in the shadows!
Brand Identity Swap
What if Pepsi looked like Coke? Batman looked like Superman? Take any popular item and swap its brand identity. Like on all the 12 days, you only have one day to create the image. Be creative and have fun!
What if Pepsi looked like Coke? Batman looked like Superman? Take any popular item and swap its brand identity. Like on all the 12 days, you only have one day to create the image. Be creative and have fun!

Edible Architecture
Have you ever been so hungry that you could’ve eaten a house? Well, with this assignment, you might just be able to! Design a house made out of food. Consider who might live in this house, where they are from, and what type of architecture would be involved.
Have you ever been so hungry that you could’ve eaten a house? Well, with this assignment, you might just be able to! Design a house made out of food. Consider who might live in this house, where they are from, and what type of architecture would be involved.

Grade 9: Illustrator
TUESDAY
Period 5: Using the Pathfinder Tool
Check out the link below for a tutorial on how to use the Pathfinder tool. Step up your page in a similar fashion so you can practice using it. Start with a two shapes overlapping each other. Make sure the shapes have a different fill (colour). Select both shapes by using the black mouse and drawing a box around both shapes. This will select both of them. Choose your first pathfinder option and see what it does. Press CTRL+Z to undo the change so you can try again.
Check all this out by clicking on the button below and scrolling down to the video.
Once you have finished experimenting with the Pathfinder Tool, head to Illustrator Lessons and complete the tutorial called "Designing a Logo". There are several videos to build that particular logo that use vital Illustrator tools and techniques. Place your results on your website on the "Extras" page.******To place onto your website you need to go FIle > EXPORT and change the file format from AutoCAD to JPEG. Then make sure it is on your name drive. Press EXPORT. A second box will appear - you need to make the quality as high as possible and the resolution should read 300 ppi not 72 ppi.
Period 6: Designing a Logo Tutorial
Head to the Illustrator Lessons page and scroll down until you see the "Designing a Logo" tutorial. Watch the videos (sound low please or use headphones) and see if you can make that particular logo. Place your results on your website on the "Extras" page. See above for a refresher on how to export as a JPEG.
THURSDAY
Period 5 and Period 6 classes are going to be working on creating a character in Illustrator using the tutorial video below. You can either have the sound on low or use headphones.
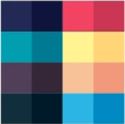
The colour swatches below should be copied and pasted in Illustrator so you can use the colours provided as the video demonstrates. (Right click - Copy and then CTRL+V once in Illustrator)
The shapes on the right are the shapes you are going to need for this video tutorial, so please draw out these three in Illustrator using the shape tool. Select a grey FILL and make sure the STROKE for each shape is turned off (Red Slash) (You cannot just copy and paste these three shapes - you need to draw them out!)
Export your finished product as a JPEG and place on your website on the extras page! If you are feeling adventurous you could always modify this tutorial to make a more interesting character.
Period 6: Designing a Logo Tutorial
Head to the Illustrator Lessons page and scroll down until you see the "Designing a Logo" tutorial. Watch the videos (sound low please or use headphones) and see if you can make that particular logo. Place your results on your website on the "Extras" page. See above for a refresher on how to export as a JPEG.
THURSDAY
Period 5 and Period 6 classes are going to be working on creating a character in Illustrator using the tutorial video below. You can either have the sound on low or use headphones.
The colour swatches below should be copied and pasted in Illustrator so you can use the colours provided as the video demonstrates. (Right click - Copy and then CTRL+V once in Illustrator)
The shapes on the right are the shapes you are going to need for this video tutorial, so please draw out these three in Illustrator using the shape tool. Select a grey FILL and make sure the STROKE for each shape is turned off (Red Slash) (You cannot just copy and paste these three shapes - you need to draw them out!)
Export your finished product as a JPEG and place on your website on the extras page! If you are feeling adventurous you could always modify this tutorial to make a more interesting character.
|

|
